
So you’ve decided to use WordPress! You’re definitely not alone. According to a recent report, WordPress is now used by nearly 60% of websites. It’s even easier to install than ever, now that most web hosts offer it so freely. But what to do after that initial WordPress installation? While it’s tempting to jump right in to making that website look awesome, but there are a few things you should do before diving in.
WordPress Installation Checklist
1. Install a Backup Utility
The very first thing I install after each fresh WordPress installation is called Backup Buddy. That way, if I’m messing around with themes or something goes wacky, I have a fallback. When you’re working on the site, backup often. There are other free resources out there, but his is the one I trust.
2. Name Your Site
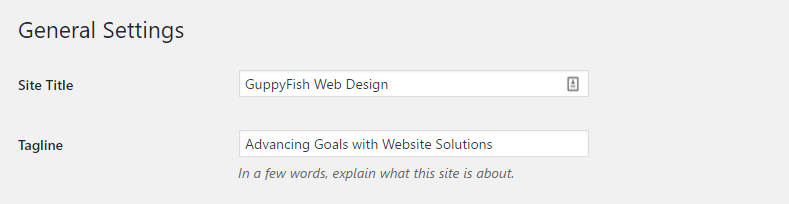
You probably did this during your WordPress installation, but be sure you give your site a name. Usually the name of your business or organization will suffice. It’s best if the name gives users a idea of what they’ll see when they visit. For example, try to stay away from generic names like “My Website” or “My Blog”. You can change the title whenever you need to. Just click Settings in the left toolbar.
3. Change Your Tagline
This is one of the most overlooked things on WordPress, but it can be one of the most obvious. WordPress defaults the tagline to “Just Another WordPress Site”. That’s hardly professional sounding! You may think that nobody ever sees your tagline, but that’s far from the truth. Some themes print the tagline directly under the site’s title. Even if your theme doesn’t do that, it can show in the tab or bookmark of your user’s browser. Another consideration is that using keywords in your tagline can significantly help your SEO. At the very least, do it for social media. I’ve seen people share their new sites on Facebook, and their tagline shows up in the post. Your tagline should clearly indicate what your organization offers.
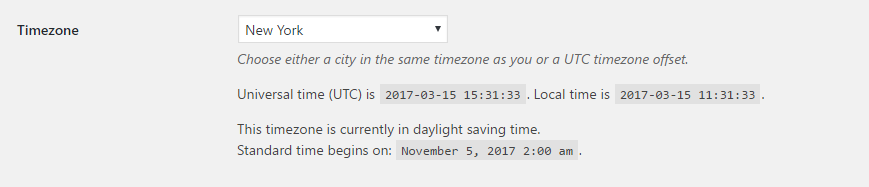
4. Confirm Your Timezone
This is another item that is often overlooked after a new WordPress installation. It only takes a minute to scroll down on your settings page and change to your local timezone. This is especially important if your content is time sensitive. You don’t need items time stamped with times that don’t make sense to your end user. If you’re running a contest and it ends at a certain time, you want your website time to be consistent with what you’re telling visitors. You can find it right on the settings page under the tagline.
5. Look at When Your Week Starts

One of the most popular WordPress plugins is The Events Calendar. I have used it on numerous sites, along with one that uses Google Calendar feeds called Simple Calendar. One of the first times I used it, I couldn’t understand why all the displays had the week starting on Monday. I looked and looked in the plugin settings and couldn’t find where to change it. It turned out that I had completely overlooked the actual WordPress settings. On that same settings page with your site’s title and tagline, you can indicate on what day you’d like the week to start. Most calendar or events tools you use will adopt this universal setting. Now it’s one of the first things I change after a WordPress installation. I don’t understand why the WordPress default is Monday, but they rarely ask me about these things.
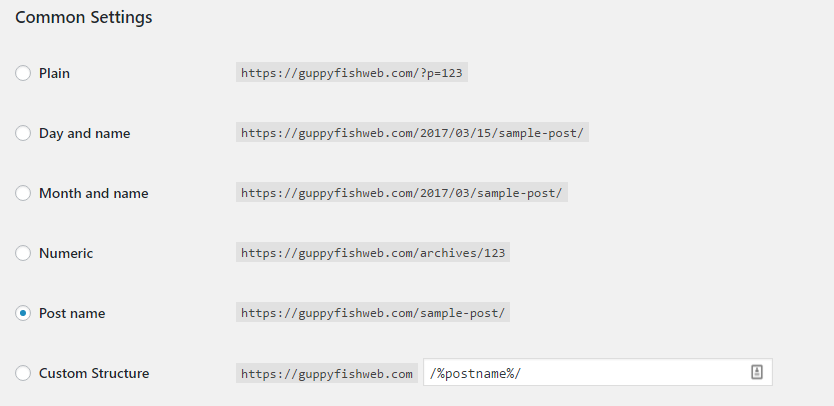
6. Check Your Permalinks
What is a permalink in WordPress? Basically speaking, it’s the url or web address assigned to a specific page or post on your site. You want to go under settings to permalinks and check it out. Make absolute sure that your post/page name is included in your default permalink setting. This will help search engines find you and make it clearer to visitors looking at your pages or posts. Since including the day/month in the permalink lengthens the url, I usally choose the simple post name.
7. Install Necessary Plugins
Now that you’re through the Settings part of your WordPress installation, it’s time to install some useful plugins. Here are some good ones to get you started:
- Use a backup plugin (which you should have already installed by now).
- Make sure your WordPress security is covered. This is really important.
- Look for something that can help you with your SEO. I use WordPress SEO by Yoast.
Now that you have all your bases covered, you’re ready to choose a theme and create a site that will help meet your goals! Don’t overlook the back-end stuff, and keep swimming along!
0 Comments